
Introduction
This package of programs is designed to simulate the acquisition of seismic data followed by a very basic processing sequence to produce a seismic section which can be directly compared to the starting geometry used in the simulation. The objectives are to:
- Illustrate many artefacts that are generated by the seismic reflection technique.
- Give an introduction to several of the most important processes used to produce seismic images.
- Introduce some of the factors that must be considered in design of seismic surveys.
The programs currently use IDL VM which must first be downloaded but note that this “run-time-only” version of the complete IDL package is completely free. Unfortunately, although IDL runs on PCs, Macs and Linux machines, my programs are only compatible with the windows version (programs will be converted to Javascript during 2014). To begin, download the Seismic Programs and then right click on the folder to extract them. This “unzipping” MUST be done since, otherwise, the programs do not fully function.
Simulation of Marine Seismic Acquisition
Double click the MarineSeismic.sav file and accept the default answer (MarineSeismic.txt) for the dialog that then opens. You should see this:  Now just follow the instructions in the “MARINE SEISMIC SIMULATION EXERCISE” window of this display.
Check Results
Close the MarineSeismic.sav window and open DisplaySeismic.sav instead along with the default text file (Display.txt) when it asks for this. Again follow the instructions given in the resulting display. NB the simulation program (MarineSesimic.sav) sometimes fails to produce good data. If the new display does not show something like:  then re-run the first program. If you’re very unlucky, you may have to do this several times.
Velocity Analysis and Stacking
Now close DisplaySeismic.sav and open velocityanalysis.sav. As before, use the default text file (VelocityAnalysis.txt) in response to the dialog that appears, and then follow the instructions. Once you have performed velocity analysis on several locations, you should see something like this: 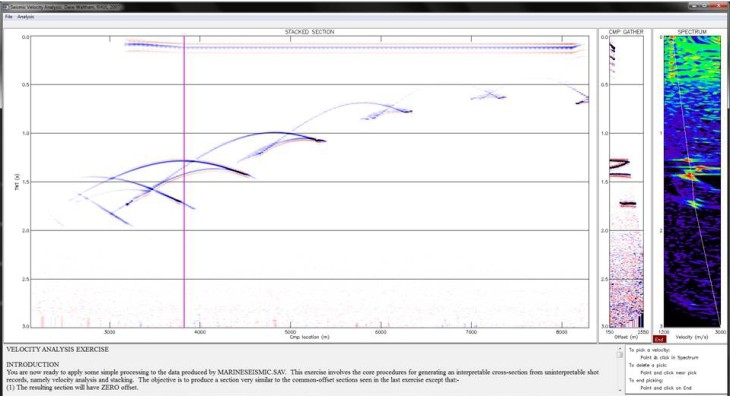 Continue velocity analyses until the whole section is sharp and clear and then ensure that you have saved both of the required results (a stacked section and a velocity distribution). You can then move to the final exercise.
Migration
Close velocityanalysis.sav and replace it by MigrateSeismic.sav (using the default text file of MigrateSeismic.txt). Once again, just follow the instructions. After some trial and error you should get something like:

If your result looks much noisier than this, try adjusting the display parameters (the default overlap is usually much too high, drop it to about 5). Compare my final result to the true reflector geometry in the first figure on this web-page (NB the locations are slightly different as the final section has shifted along to the right of where the simulation started). How did I do? Can you do better?